Although thousands of cryptocurrencies exist, many smaller and mid-cap altcoins are not listed on centralized crypto exchanges (CEXs). DEXs play a crucial role in this scenario. So, to fully utilize the benefits of decentralized finance (DeFi), understanding how to use DEXs is key.
Call them Peer-to-peer platforms that handle billions of transactions each day. Furthermore, you have full control over your assets and can engage directly with blockchain liquidity pools. However, DeFi remains notoriously complicated, particularly for beginners. Buying cryptocurrency on a DEX can be intimidating if you’ve only used centralized services like Binance or Coinbase.

However, once you understand the technique, it becomes second nature. In this guide, we’ll go over how to use a DEX to purchase, sell, and exchange tokens. We’ll also add some important security advice to assist you avoid frequent errors.
Decentralized Exchange and How It Works?
A decentralized exchange is a trading platform that allows users to purchase and sell cryptocurrencies directly, eliminating the need for a middleman. This is how it works.
- Peer-to-Peer Trading: Users trade directly with one another, eliminating the need for a central authority.
- Smart Contracts: DEX platforms frequently use smart contracts, which are self-executing contracts with the agreement’s terms directly specified in code. This guarantees that trades are conducted automatically when specified criteria are met.
- Liquidity Pools: Many DEXs have liquidity pools where users can contribute assets to facilitate trade. In return, they receive a portion of the transaction fees.
- Non-Custodial: Users keep control of their private keys and monies, lowering the danger of attacks that frequently occur on centralized exchanges.
- Anonymity and Privacy: DEXs often demand less personal information than centralized exchanges, allowing for more privacy when trading.
Step-by-Step DEX User Guide
To use a decentralized exchange, you’ll need a few tools and knowledge of blockchain transactions. This is a condensed outline of everything you’ll need to perform:
- Select a DEX based on the blockchain and tokens you prefer.
- Buy cryptocurrency (e.g., ETH or SOL) on a controlled exchange to cover gas costs.
- Create a Web3 crypto wallet that supports the chain your DEX is running on.
- To fund your wallet, transfer assets from your exchange.
- Connect your wallet with the DEX.
- Approve smart contracts and begin trading.
We’ll now break down each stage in further detail, so that even a first-time user can follow along.
1. Choose a DEX
The first step is to select the DEX you want to utilize. The sort of tokens you want to buy will determine your options here. Most DEXs are chain-specific, which means they only support assets that are native to a single blockchain. For example:
- Uniswap mostly uses Ethereum and its Layer-2 protocols, such as Arbitrum and Optimism.
- PancakeSwap is intended for Binance Smart Chain (BSC).
- Raydium supports trading on Solana.
- Trader Joe operates on Avalanche.
Uniswap is typically the preferred DEX for purchasing ERC-20 tokens. Meanwhile, if you’re interested in Solana-based tokens, you should check into Solana-native platforms.
When selecting a DEX, consider trade volume, liquidity, and whether it is audited. A trustworthy platform will lower the likelihood of smart contract vulnerabilities.
2. Buy Crypto
Before you can trade on a DEX, you must have some cryptocurrency in your wallet. Specifically, you need:
- Base currency: ETH, SOL, AVAX, or BNB, depending on the blockchain.
- Some of the same currencies for gasoline fees: Every trade on a DEX requires gas to complete transactions on the blockchain.
Begin by purchasing the blockchain’s native token on a controlled exchange like Coinbase, Binance, Kraken, or OKX. For example, if you’re trading Raydium, buy SOL.
Most centralized cryptocurrency platforms use Know Your Customer (KYC) protocols. To withdraw funds, you must submit KYC documentation.
Once the purchase is complete, you must transfer the cryptocurrency to your Web3 wallet. This leads us to the next point.
Create a Web3 Wallet
Accessing decentralized applications (dApps) requires a Web3 wallet. This non-custodial crypto wallet provides you direct control over your funds, supports smart contracts for transactions, and connects to decentralized exchanges. Some of the most popular possibilities are:
- MetaMask
- Phantom
- Rabby Wallet
- Trust Wallet
Creating a cryptocurrency wallet is an easy process:
- First, install the wallet extension or mobile app.
- Next, create a new wallet and save the seed phrase safely. Do not share this phrase with anyone because it could result in the total loss of your assets.
- Finally, create a strong password to protect your account locally.
Fund Your Web3 Wallet
Once your wallet has been set up, send the cryptocurrency you purchased from the centralized exchange to your wallet address. To accomplish that, take these steps:
- Copy your wallet’s public address: The address is normally seen at the top of the wallet app/extension and appears to be a random string of numbers and letters. Solana addresses are 32 to 44 characters long, whereas Ethereum addresses are 42 characters long and begin with “0x”.
- Return to your centralized exchange: Return to the CEX where you made your purchase and locate the “Withdraw” option.
- Paste the wallet address and send the funds: Enter the address of your Web3 wallet in the destination address area.
Make sure you select the suitable network. If you use MetaMask on Ethereum, transmit ETH via the Ethereum mainnet. Sending assets to the wrong chain can lead to permanent loss. Once the transaction has been confirmed, your wallet will be available for DEX trade.
Connect to a DEX
Finally, it is time to interface with the DEX. To accomplish that:
- Visit your preferred official DEX website (double-check the URL to avoid fraudulent attempts).
- Next, click the “Connect Wallet” button.
- Your browser extension or wallet app will ask you to approve the connection.
- Once connected, your wallet address will be visible on the DEX UI.
Before you trade, you must authorize the token contract. This is a standard operation in which the DEX spends your token on your behalf. While this is an essential step, be careful to only approve contracts that you trust. If you ever need to revoke access, use a tool like Revoke.cash.in.
Then you may choose the token you wish to swap, enter the amount, and confirm the transaction. Your wallet will ask you to approve the transaction (and pay the gas fees), which will then be performed on-chain.
Security Considerations When Using a DEX
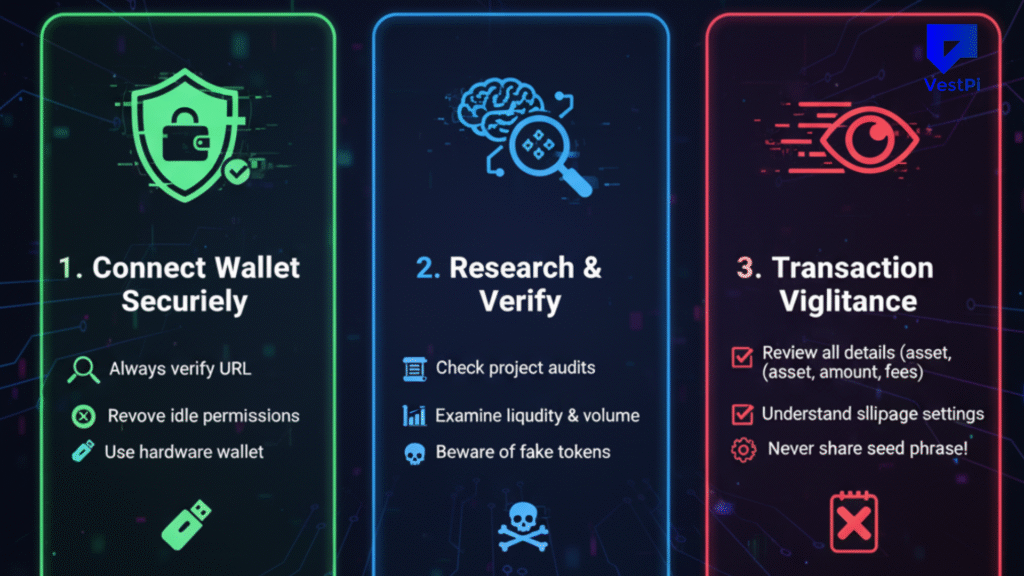
Decentralized exchanges give you full control, but they also increase your security responsibilities. Let’s go over some best practices.
1. Use a VPN to Prevent Man-in-the-Middle Attacks
A VPN hides your IP address and encrypts your traffic. This decreases the likelihood that hackers will intercept your transactions or metadata. Always use a VPN, especially if you’re using public Wi-Fi.
2. Only Use Official DEX Websites
Phishing scams are prevalent in cryptocurrency. Fake DEXs frequently impersonate legitimate sites in order to deceive users into disclosing their seed phrases or authorizing dangerous contracts. To remain safe:
- Bookmark the correct URLs.
- Avoid clicking randomly generated DEX links from social media or email.
- Verify domains with resources such as Chainlist or CoinGecko.
3. Use a Hardware Wallet for Secure Storage
For big cryptocurrency holdings, consider adopting a hardware wallet like Ledger or Trezor. These devices securely store private keys offline, making remote compromise nearly impossible.
4. Be Cautious With Low-Liquidity Tokens
Many coins on DEXs have limited liquidity, making them great targets for drug draws or honeypots. If you can’t get information about a token from a trustworthy source, it’s probably not worth the risk. To assess contract data, liquidity pools, and holder distribution, use token explorers such as
- Etherscan
- Solscan
- BscScan
5. Watch Out for Malicious Wallet Approvals
Every time you approve a token for trading, you’re giving a smart contract authority to move your funds. As a result, scammers often try to deceive users into approving contracts that can empty their wallets. To avoid this:
- Only approve what you actually need.
- Use tools like Etherscan or Revoke.cash to evaluate and revoke token approvals on a regular basis.
- To minimize potential points of failure, revoke access to any DEX or dApp you no longer use.
6. Double-Check Network Compatibility
Sending coins across incompatible blockchains can result in irrevocable loss. Always make sure the token and wallet are on the same network. Today, most centralized exchanges will issue a warning before executing the transaction.
Take Home
Learning how to use DEXs is not as difficult as it appears. Once you understand the process, from choosing a DEX to conducting a secure trade, it becomes an effective tool for accessing the larger crypto community. Decentralized exchanges provide the foundation of DeFi, providing permissionless trading, increased token availability, and complete user control.
At the same time, increased independence entails greater responsibility. Using a DEX responsibly entails controlling your keys, confirming each step, and remaining current on security concerns. By adhering to recommended procedures and taking safeguards, you will be well-prepared to utilize DEXs with confidence.